
First Four In a Row tutorial This Nugget has been written by SunnY DaY on 1 Aug at 2:16PM Category: Four In a Row Hello! I have decided to write down a tutorial on Four In a Row. Maybe more people will get interested in it and its variants and more tournaments will be held on GoldToken. This will be part 1 of two of the tutorial, without any advanced tactics, just some introduction. Table of contents:
The game was originally designed by Hasbro in 1974, under the name of 'Connect 4'. The board size was 7x6, and yellow and red pieces were used. There are lots of programmes on the Web, which can help you mastering your skills. However, most of them also use 7x6 board, and cannot be used for cheating here. The 7x6 (and numerous other boards) have been solved - scientists have had all possible moves analyzed and answer the question - who wins if both players play well? This doesn't apply to our board - 8x8. At least I haven't found any data about that. However, a general opinion amongst the best players is that 8x8 is won by red (second) player. What does that mean? It states, that if blue (first) player plays perfect, and red player plays perfect, the red player wins the game. In other words, if blue can't trick red into making a wrong move, the red will win eventually. I will write down some guidelines that should be followed. First, try to put your pieces in strategically important spots, while preventing your opponent from doing so. Think forward before you make your move, analyze carefully what opportunities will your opponent have after you have made your move. Secondly, see to it that your opponent doesn't get into a favourable situation by stacking many pieces very close to each other. Think what dangers he/she can create in his/her next move. Later, I will provide a table of players' possible dangers with description which are important, and which are harmless. Many games' outcomes are determined in first 5-6 moves of both players.
In this section I would like to describe some terms I will use in this article, give their definitions, and make everything clear. Danger - originally, articles about Four In a Row used the phrase 'threats'. I have chosen dangers since they have less pejorative meaning. And so, a danger is a situation in which a player can win the game in his/her next move or in next few moves. As it is a basic tutorial, it means any situation when a player has connected 3 pieces in a solid row. Dangers might be direct and indirect. We will be talking mostly about indirect dangers. The direct ones require immediate responce from the red player (B1), or the game will be lost. Direct dangers may be used to force the opponent into making a specific move, which is a part of our tactical plan. Below you can find an example of a direct danger: 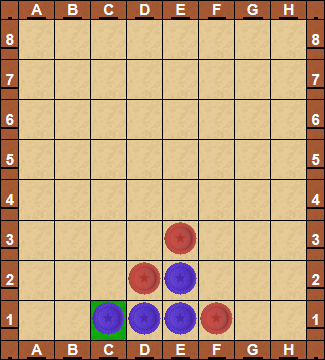 Basic properties of indirect dangers are as follows. Indirect danger causes a column to be completely unplayable for the opponent till the end of the game. This means any attack above that danger is completely useless, unless the indirect danger's creator decides to sacrifice it. To sacrifice a danger is to play your piece directly below the danger so that your opponent can block it in his/her next move. 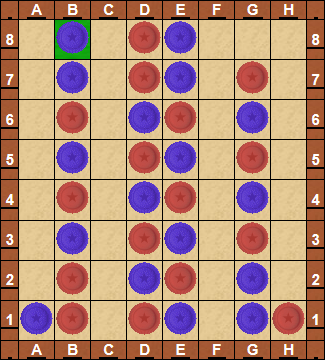 In this game, red created an indirect danger in C2 (diagonal B1-E4), making blue's C7 (diagonal B8-E5) useless. To sacrifice it, red player would have to play in C1. This, however, is a double-edged weapon, since when there are no other moves left, you might be forced to sacrifice your danger, and the other player might be lucky enough to win with his/her indirect threat above yours. Detailed information about this will be written at the bottom of this article. Odd row - this will be a reference to any odd row on the board (particularly rows 3,5, and 7). Even row - like above, but it will refer to rows 2,4,6, and 8.
How to begin? In the middle, of course! Well, not quite. If what I have written earlier is truth, it doesn't matter where you should make your first move. You lose against the red anyway! The middle appears to be the best choice, since mid-field pieces can be a part of much more lines then pieces on the edge (A1 can create only 3 lines - A1-A4, A1-D1 and A1-D4, right?) while D1 and E1 can create 7 lines. There's a drawback, however. Playing D1 allows red to play D2, which can create even more lines than D1. Your possible reply, D3 is better, but so is red's answer - D4 - in the middle of the board! Plus, starting in the middle is a well-known variant for good players. And since they know them well, the chances you will trick them are low! As a blue (yellow) player you have nothing to lose! Be practical and creative! The more unusual position, the higher chances red will lose are! The first thing you should focus on is the opening. Like in chess, players should follow only the good ones. Game goals. Game goals is what you should aim at so to win your game. Most middle-skilled players focus on creating a danger and defending it at all costs, and later hope it will grant them a win. Well, depending on your luck is not enough to win a tournament. This section will briefly introduce what both players should seek during the game. Blue player: Your task is hard. You need to create dangers in odd rows, even rows are useless for you. More over, if you fail to create an odd-row danger, whilst creating an even-row one it might make you lose the game faster. If you manage to make an odd-row danger, it's an almost guaranteed win for you, with a few exceptions. These exceptions are: If red create an even-row danger directly below your odd-row danger. If red also create an odd-row danger in a different column. If red create two odd-row dangers in two different columns. Other than that, the win is yours! Red player: Your job is rather easy, but you should never underestimate your opponent! He is to create an odd-row danger, which means, he should secure pieces in third/fifth/seventh row. Red pieces are in better situation, because they need to secure 2nd row (or 4th, 6th or 8th). Odd-row dangers are not entirely useless for you, in fact they might help you win the game, or disrupt blue's strategy, if you are feeling they have an advantage. You should focus on destruction, preventing blue from creating odd-row dangers. This is your priority, chances of winning for you will pop up almost entirely themselves! However, if blue manage to create an odd-row danger without any of your even-row dangers directly below it, don't panic. Your situation is bad, but you haven't lost yet. Try creating an odd-row danger somewhere else! This will at least save you a draw! Some explanation to the above. Notice, that the game board consists of 64 separate spaces. This means, each player may play up to 32 pieces until the board is full and the game ends. After blue's second move we have what follows - 3 pieces occupy the board, 61 empty spaces remain. After red's responce, there are 4 pieces on the board, and still 60 places for next pieces. Which implies: Even number of pieces (or empty spaces) means it is blue player to move, and odd number of pieces/spaces left tell that it is red player's turn now. The following picture is a pre-determined draw game (no matter who's turn it is now, the game will end in a draw). According to my explanation you should be able to guess who will play next. 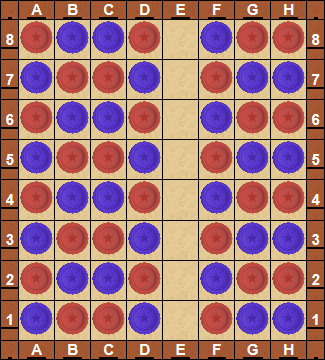 You were right! Blue player will occupy E1, E3, E5 and E7, and red will place his pieces in E2, E4, E6 and E8. That's a proof of what both players should aim at.
Blue openings. Blue openings show good starts from blue's point of view, with at least one poor move from the red. I Want to show how to develop a good position andd finally win the game when playing blue. 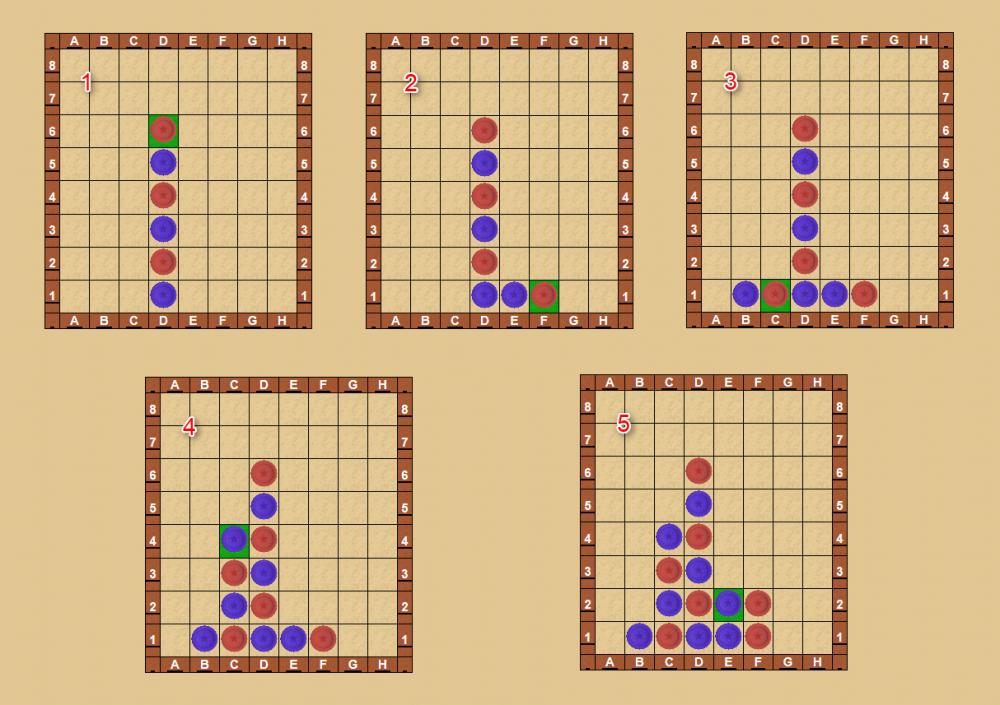 We will start with a classical follow-up strategy, where red duplicates blue's moves . Blue starts in the middle, having the most comfortable number of potential future dangers. Red replies above and so on, both players hoping to control the middle D4 and D5 squares (1. D1.D2, 2.D3.D4, 3. D5.D6). After this is done, each next square in column "D" is less attractive, so blue decides to play 4. E1, creating a trap for red, and weakening red's E1-A5 diagonal. Red now must play either 4. ...C1 or ...F1, and chooses the latter, which is slightly better. Blue now has only two valid options, 5. B1 or 5. F2. All other moves are very weak and enable red a good game. Blue follows with 6. C2 - only good option now, and red answers with 6. ...C3 to block blue's vertical C3-D3. 7. C4 has the same meaning for blue, as 6. ...C3 for red. Red is not afraid of blue C5 (which can be defended) so decides to attack in the other part of the board: 7. ...F2. Situation is getting dangerous on the east side, so blue decides 8. E2. This interrupts some of red's plans, and creates an odd-row diagonal danger. All previous moves were correct, and so red player is winning. However, the path to win is complicated so for average players, we must assume that no player has an advantage right now. 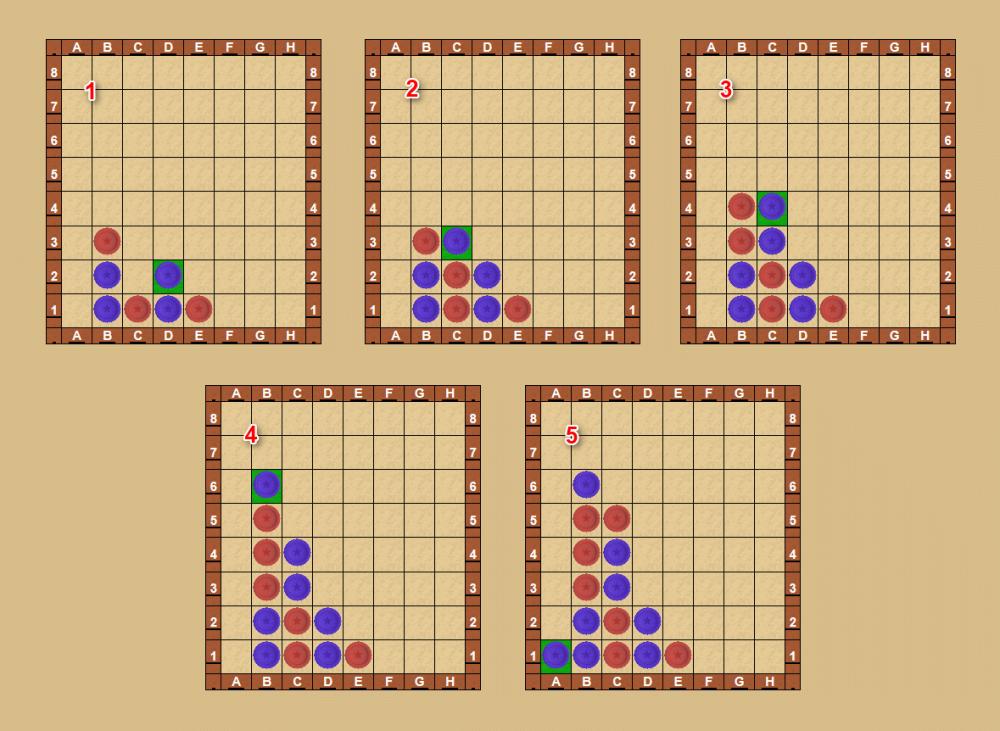 Starting moves (1): 1. D1.E1, 2. B1.C1, 3. B2.B3, 4. D2 Red decides to play 4. ...C2 in order to block blue's potential vertical danger in 2nd row (making a forced 5. ...C2/E2 is looking bad for red), for which blue surprisingly answers 5. C3 instead of 5. D3. D3 only looks good, in fact it's more helping red than blue now (2). Red is aware that blue is constructing a diagonal odd-row danger and blocks it immediately with 5. ...B4, to which blue replies with 6. C4 (3). The obvious move B5 is an error now, since red can play C4 and have a strong vertical danger in 4th row. Red continues with 6...B5 (4) and 7. B6.C5. Let's analyze the situation now. Red has a vertical danger in 5th row, however it's not bothering blue much, since blue can play 8. A1 (5). This move creates a diagonal even-row danger which is important, since it neutralizes red's 5th row attack. (In any moment blue chooses, they may sacrifice their diagonal playing D3, forcing red to play D4, and blocking red's vertical in D5). Later in this game, players will fight to control E3 and F3. 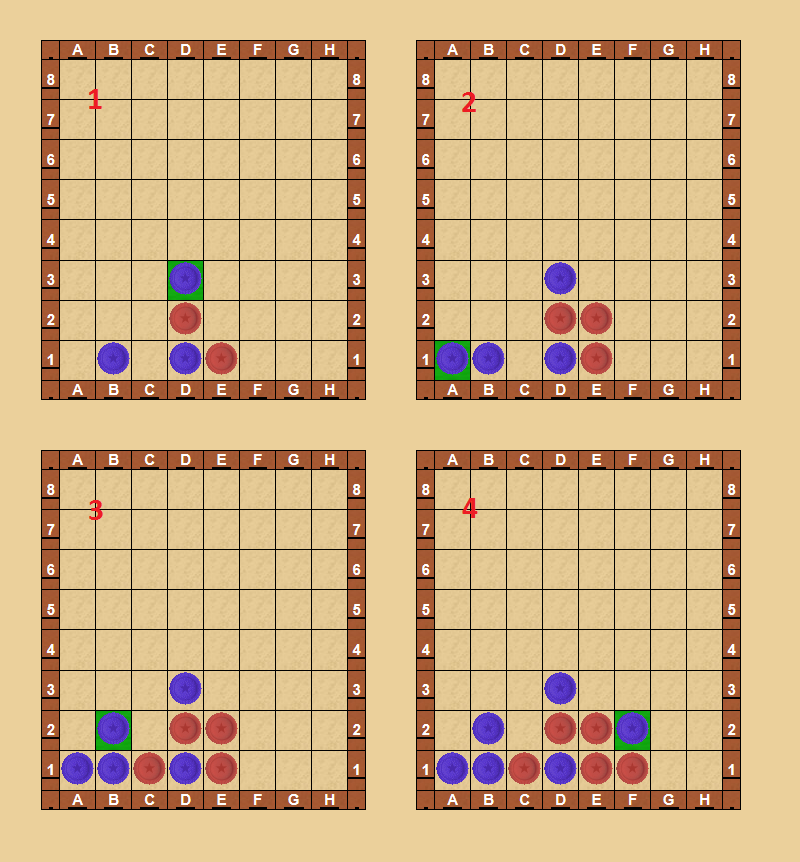 Starting moves (1): 1. D1.E1, 2. B1.D2, 3. D3 Red will most likely play 3. ...E2, attempting to take control over 2nd row. Blue can't afford that, so they play 4. A1 (2) C1. (3) shows next move to be 5. B2. Why not C2? 5. C2 allows 5. ...C3. and both players have diagonal even-row dangers, which is good for red. To avoid that, blue plays 5. B2. This offensive move brings 2 threts for red, which cannot be neutralized in one move. First one is D4 which if controlled by blue, gives them a diagonal odd-row danger. Second threat is 6. B3 with a forced 6. ...B4, followed by 7. E3 - another odd-row danger for blue, this time vertical. Seeing this tough situation on the left side of the game board, red try their chances on the right side 5. ...F1. However, blue blocks it with 6. F2 (4), and the situation is clear. Either way, blue will construct an odd-row danger and win the game. 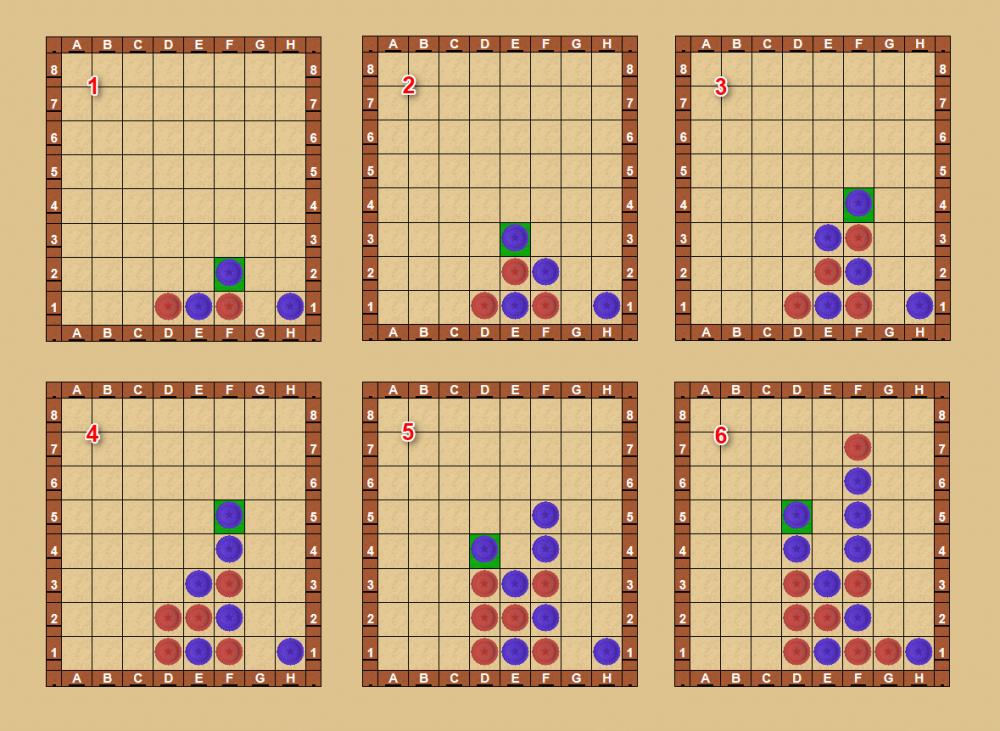 Starting moves (1): 1. E1.D1, 2. H1 (it's a different way to answer 1. ...D1. look up the previous example - 2. G1 would also be good for blue) F1, 3. F2 This situation is hardly seen in games, and not many players know how to play this opening properly. If we look closely, we would see red has only two good moves here. 3. ...E2/F3, and chooses the first one. blue plays a follow-up 4. E3 (2). Allowing red to play there would end up pretty badly, with blue men piled up near the right edge of the game board, and red controlling the midfield. 4. ...F3 blocks blue's potential odd-row danger, and 5. F4 (3) is a deep strategical move. It creates an offensive situation which red will want to destroy in their next move (5. ...D2), but more importantly, is a start for a diagonal danger E5-H2. Blue now wants to take control of the 5th row by playing 6. F5 (4) instead of 6. D3. Red uses that to play 6. ...D3. Now red have two diagonal even-row dangers after 7. D4 (5).G1. After an optional 8. F6.F7 Blue strike with 9. D5. E5 is virtually blocked now, for whoever plays there, wins the game. 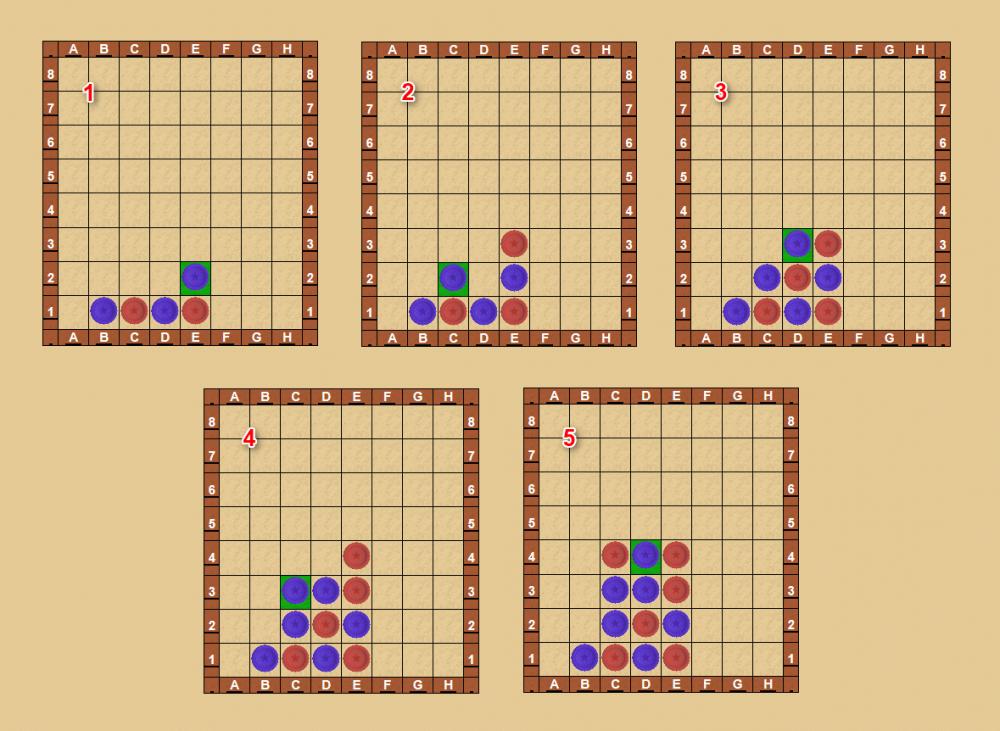 Starting moves (1): 1. D1.E1, 2. B1.C1, 3. E2 (in the other opening I showed how blue can win after B2) Red decides to block in 3. ...E3, to which blue reply 4. C2. This move is similar to E2 in context of creating a vertical danger in 3rd row. This time, however red mustn't play follow-up 4. ...C3 since they expose themselves to 5. E4 which creates an odd-row danger for blue. And so, red decide to play 4. ...D2. (Interesting - but still won by blue - variant comes after 4. ...E4, 5. D2.B2, 6. D3.D4, 7. C3.C4, 8. D5!) Then we have 5. D3.E4, a forced red move. At this moment 5. C3 is not good since red can block the vertical danger in 3rd row by playing 5. ...D3. At this moment blue is free to play 6. C3 (4). It creates another dangerous situation which red must resolve: 6. ...C4 (allowing blue to play there would result in a double danger: C2-C5 and C4-F1. Playing 6. ...F1 is also bad, since next move is a forced 7. ...C5, and blue have developed a strong position on the left side). Red could also play 6. (or 7.) ...E5 to force blue to make a move and, more importantly, block blue's upcoming attack on diagonal A1-E5. In my example red have played 6. ...C4, and blue responded 7. D4. As I mentioned before, blue construct a diagonal attack A1-E5 which is very dangerous, since should blue control B3, they would quickly win. In the following moves red will play E5 and A1 (exactly in that order) and blue will try to negate a small advantage red made on the right side of game board. 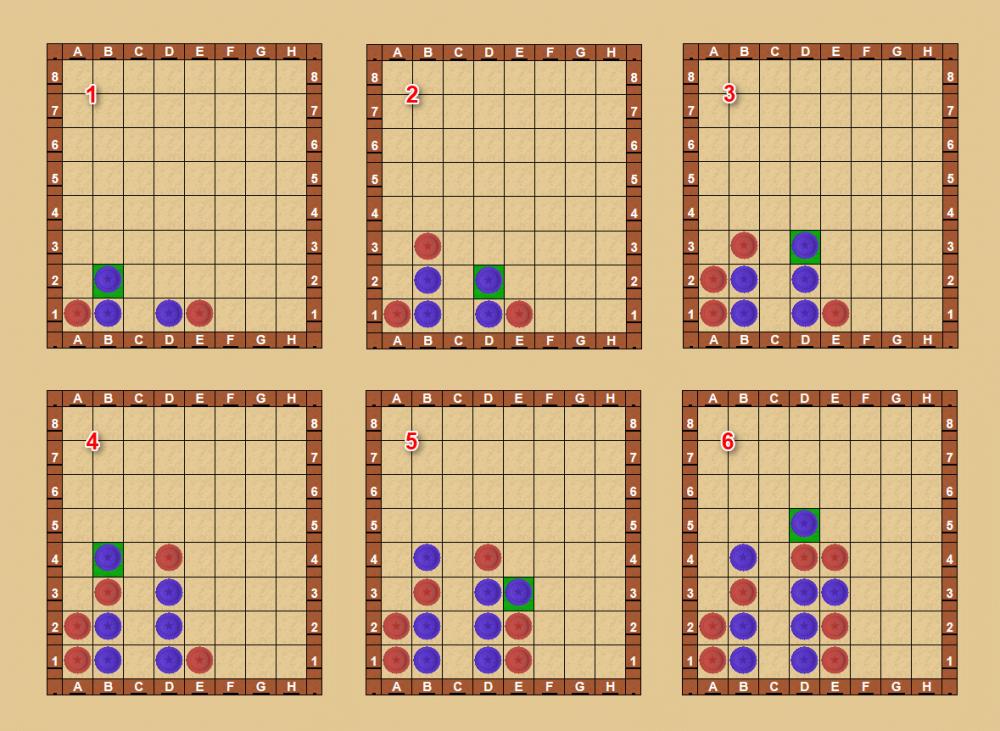 Starting moves (1): 1. D1.E1, 2. B1.A1, 3. B2 Blue made a solid start, which red must counter by a follow-up 3. ...B3. That's OK for blue, since they don't need horizontal danger at 3rd row. They play 4. D2 (2) instead. This time the follow-up strategy leads to an easy win for blue, so red decide to play 4. ...A2. 4. ...E2 is not good now because of 5. D3 followed by 6. E3. which creates a horizontal odd-row danger for blue and a strong background in the middle of the board. Blue play the only good move now, 5. D3 (3). after red's 5. ...D4 they decide to play 6. B4 (4). Why not 6. D5, or 6. E2 some of you might ask. Well, red will not gain any profit from playing there now. 6. ...D5 is useless now, since blue can answer 7. E2 which both secures their diagonal A5-D2 (red cannot play to block it since blue win in C2) Of all moves only 6. ...A3 and E2 are valid, and red choose the latter. (after A3 the game would go like this: 7. A4.A5, 8. D5.B5, 9. D6 and blue have 2 even-row of 4 pieces in diagonal B4-E7 plus the ability to secure column "C" by 10. E2. If red block 9. ...C2, then 10. C3 and we're back to variant from the picture (5)) Talking about (5), red played 6. ...E2 and blue 7. E3. At the cost of horizontal danger in C2 (which technically ensured a diagonal win in A5-D2) Blue started to attack in right side of the board - horizontal danger in row 3. Red are forced to play 7. ...E4 and blue answer 8. D5 (6), blocking any possible red atacks on the left side. (allowing blue to play 8. E4 would result in 9. C1.C2, 10. F1, 11. F2, 12. F3 and a win for blue in their next move.) 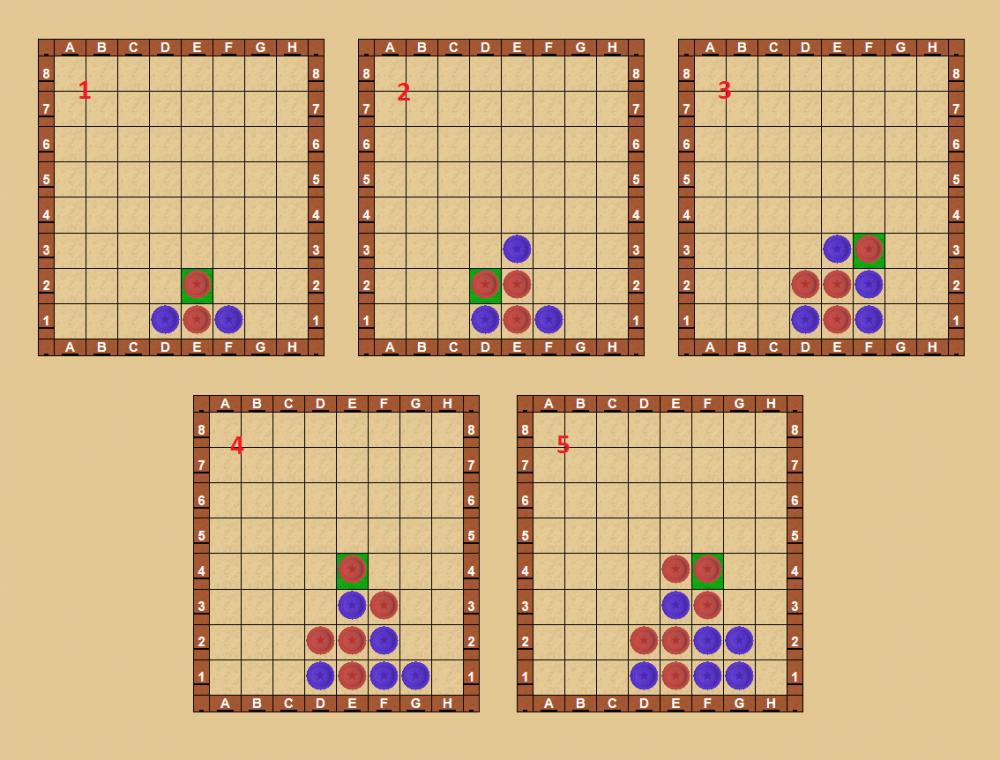 Starting moves (1): 1. D1.E1, 2. F1?.E2 Last move fully utilizes blue's mistake. It puts a solid ground at row 2, and blocks any possible blue diagonals. 3. E3, blue don't want to be forced to play E4 later, so red can play 3. ...F2 or, slightly better D2 (2). Both moves attack 2nd row. Blue's answer is obvious - 4. F2. And so, red continue to put pressure in the middle 4. ...F3. (3) Blue go now for the diagonal (5. G1?) - an error, but blue position is lost in the long run anyway - there were no positive moves at that moment. Red play 5. ...E4 (4), to which blue answer 6. G2. Another bad move, but 6. F4 is not really better. In their 6th move, 6. ...E4 red create a 2nd even-row danger, securing that game long before players run out of moves. 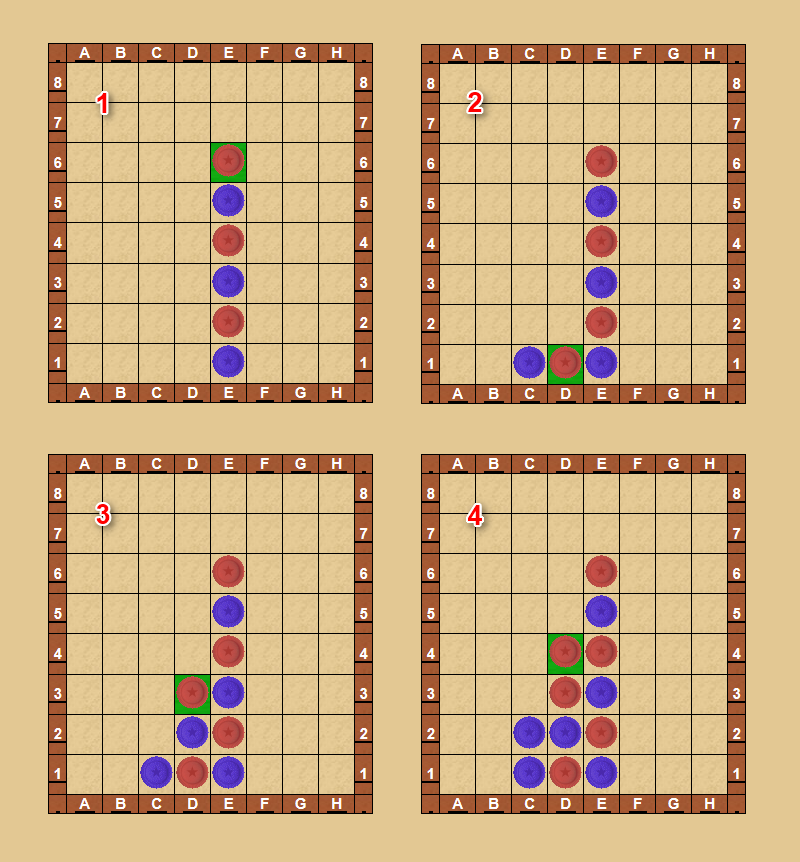 Starting moves (1): 1. E1.E2, 2. E3.E4, 3. E5.E6 A classic follow-up strategy. Blue plays 4. C1 in order to trick red into making a bad move. Red responds with 4. D1 (2). Only 2 moves give blue a chance now (5. C2 and 5. D2) and blue choose 5. D2, not letting red to create a horizontal danger in row 2. 5. ...D3 (3) - red's move is similar to blue's last one - not to let the opponent to create a horizontal danger in 3rd row this time. Just like in the previous opening, blue "ran out of" good moves and are in a dilemma: 6. D4.C2 and red have a dangerous attack on the left side (which gives them at least a draw) or 6. C2.D4 (4). Blue defend themselves on the left side, but remain with two useless even-row dangers. Red, after D4 take control of midfield and have an even-row danger which might grant them a win. In due course, red must be careful not to let blue play in F2, if they do not control D5 and H1. Other then that, red gets an easy win. 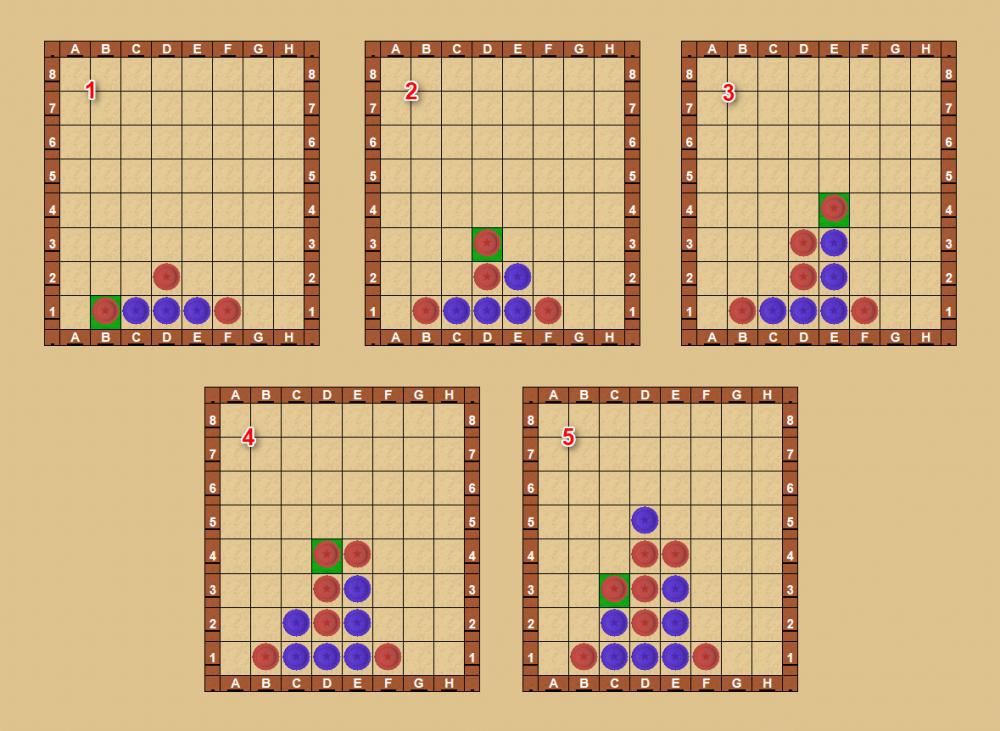 Starting moves (1): Most likely (theoretically there are a few more possibilities different than the one described below): 1. D1.D2, 2. E1.F1, 3. C1.B1 Another common opening. But how should red play to turn the tide and win? 4. E2. Blue don't want to deal with a dangerous red's attack in 2nd row, so they secure themselves at the cost of 4. ...D3 (2). All blue's hopes will fall if red plays in E3, and so blue put their piece here 5. E3.E4 (3). Now they are forced to play 6. C2 and red attack even more: 6. ...D4! (4) 7. D5 and red answer 7. ...C3 (5). Blue must be very careful now. 8. C4 is very tempting, but red's last move was tricky. They could play now 8. ...B2 and win in their next move either in A1, or E5. And so, instead of 8. C4 blue must play B2 or E5, which allows red's 8. ...C4, game over (almost). 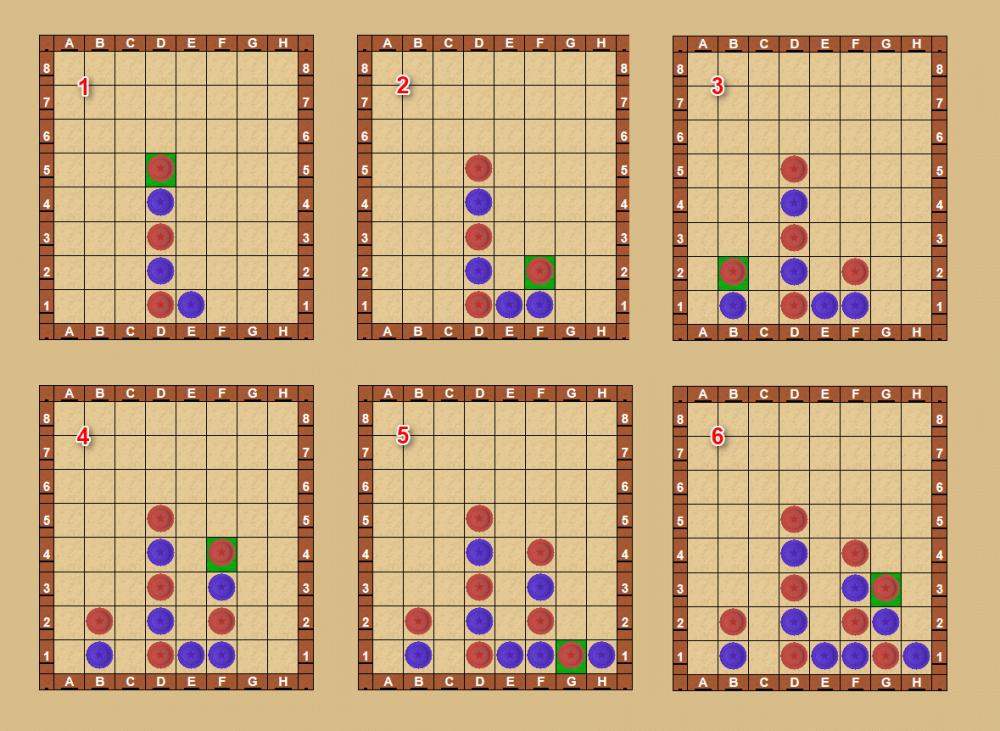 Starting moves (1): 1. E1.D1, 2. D2.D3, 3. D4.D5 This opening is played a lot, isn't it? Of three possible options (E2, F1, G1) I have chosen 4. F1.F2 (2). Blue block red's possible diagonal and red answer with the same. Blue try left side of the board 5. B1 and red keep on blocking. 6. F3.F4 (4) - a follow-up strategy. Now, blue do something different - 7. H1, forcing red to 7. ...G1 (5). 8. G2 is mandatory now, but the threat associated in this move is too obvious for red - they play 8. ...G3. As in previous positions blue don't have any more good moves left. They cannot play F5 and B3 in one move. Anywhere they choose, red wins (F5 after blue's C3 and F6 after blue's F5). 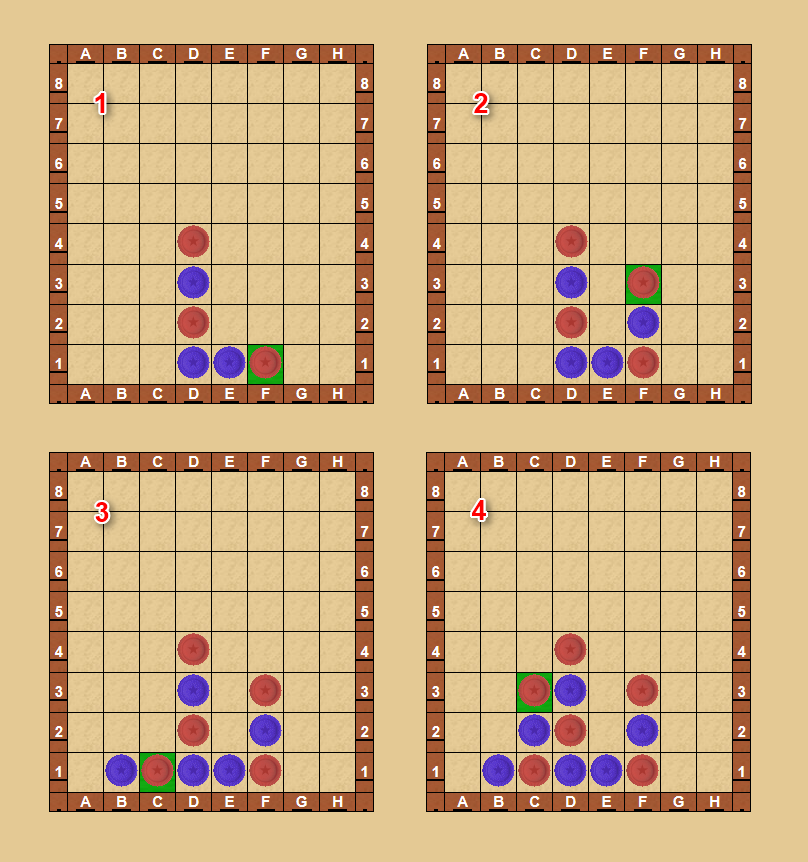 Starting moves (1): 1. D1.D2, 2. D3.D4, 3. E1.F1 We often see this one too. It's a part of red perfect play, but this time blue play 4. F2 instead of B1. (In case of 4. E2 - red should answer E3) After F2, red's best move is 4. ...F3 (2). Now blue cannot play either of 5. D5 or 5. F4, since red will play the opposite and have either horizontal danger on 4th row, or a diagonal one D5-G2. And so blue return to the main variant with 5. B1, and a forced response 5. ...C1 (3). Any move other than 6. C2 would give red an easy game, but even after mentioned move blue's position is bad. Red play 6. ...C3 (4). Red don't fear blue's 7. C4 and 8. E2, since they can play B2, and later B3, which makes blue's diagonal B5-E2 useless.
This table will provide you with detailed information about who is going to win a particular game with given dangers. It is 100% correct. Please don't ask me how to calculate it, just believe me. I will provide you only with table that includes only 1, 2 or 3 total dangers on the gameboard. You will see that 1 total danger section consists of 4 situations, 2 dangers - 9 situations, 3 dangers - 32 situations and this number rapidly grows. A little explanation what is considered in 'total dangers' calculation: 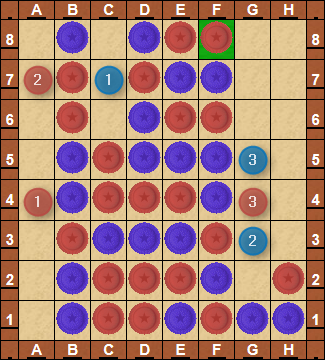 In this picture we see six dangers, three created by blue, and three created by red. However in my table, this situation would be assigned to '4 total dangers' section. Why? Both blue and red dangers marked 1 and 2 are separate, meaning they have a chance to give victory to a player. Notice red 1 & 2 are in the same column, even-row and odd-row, respectively. Otherwise (two even-rows, or two odd-rows in same column) they would be treated as one, unless there would be a blue danger in the same column, between them. Dangers marked with blue "3" and red "3" are technically useless, since either blue will claim victory in blue "2" (G3), or red will block it. Then it would be blue's turn to block red "3" (G4). Finally red would block blue "3" (G5). And so, only 4 dangers in this situation are considered. How to read this table?
Blue odd - indicates whether there is a blue player's danger in an odd row. Red odd - as above, but applies to red player. Blue even - indicates whether there is a blue player's danger in an even row. Red even - as above, but applies to red player. Any opposite players' dangers in same column - only for total dangers 2 or more. YES means there exists a column that contains one danger of each color, separated by at least one empty spot. dangers correspondence - I needed an empty column here, but it refers to next four columns of the table. These will be valid only if previous box is YES. Blue odd - States the correspondence of blue player's odd-row danger with possible red player's dangers. Red odd - States the correspondence of red player's odd-row danger with possible blue player's dangers. Blue even - States the correspondence of blue player's even-row danger with possible red player's dangers. Red even - States the correspondence of red player's even-row danger with possible blue player's dangers. GAME RESULT - that's most important - who wins if these conditions are fulfilled. Example: #35 There are three total dangers. Red has constructed 2 dangers in 2 different columns, both in odd rows. Blue has constructed one danger in an even row. Because 'any opp. players' dangers in same row' is marked YES, it means that the blue danger is in the same column with one of red's odd-row dangers. Moving on, red odd-row dangers are marked 'above + alone', which means that one of them is in the same column with blue's even row danger, and is above it, while the other blue odd-row danger stands alone. Blue's even danger is marked as 'below', and so it means it's in the same column with one of red's odd-row dangers, and is somewhere underneath it. And finally, DRAW means that the game will end up with a draw, provided players don't make any mistakes, and don't construct additional dangers.
Nugget Votes This Nugget has received 11 upvotes and 1 downvote. You need to log in first to vote on Nuggets. Nugget Comments |
©2000-2026 GoldToken.com LLC. All rights reserved. |