
Hex Nuggets #3: The Swap Rule This Nugget has been written by Point01IV on 28 Mar at 4:24PM Category: Hex With the basic game concept understood, and the premise of making “placements with purpose” taken to heart, I believe this is the best time to discuss strategy in the Swap Rule. To reiterate, white’s first turn advantage is extreme. It allows them to control the game and, in the unlikely event that the game lasts until the board is filled, gives them the final (and winning) move. To compensate, the Swap Rule was added. Simply put, after white places the first piece, black has the option of swapping sides with white, taking ownership of the piece that was placed. White then becomes black, and play continues with the (new) black player placing the next piece. This can only occur once in the game and only immediately after white places the first piece. If black declines to swap, the swap is forfeit the entire game. Thus, white should not make the goal of their first move to control the board, as they risk forfeiting the advantage to their opponent. The goal should be to find a spot to place a piece that is useful, but not so strong that it entices a swap to occur. Across my many games, I have seen (and played) several different openings as white. I do not believe there is a “best” opening, only a “preferred” one. Below are images of openings that I have seen and explanations. 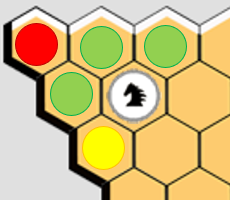 This first move can take place either in the top left of the board, or bottom right. Its power lies in creating indirect connections with the white side AND the black side. This means that if black were to place a piece on any of the green circles, white has an immediate response that secures a connection to their side, or blocks black from making any further connection to their side. The yellow circle indicates that black can still use that space for a connection by placing pieces lower on the board. Another interesting aspect of this opening is that it negates the space with the red circle. The likelihood of that space holding any significance in the game has decreased drastically. 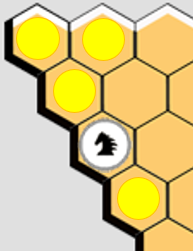 This second picture is like the first but creates a direct attack on black’s side. Personally, I do not consider this move to be as strong, but a less appealing move means that black is not as likely to swap. The yellow spaces are no longer secured, and even if white manages to connect to that first-placed piece, it doesn’t guarantee a connection to their side. Still, just because I don’t find the move preferable doesn’t mean there isn’t value in it. The likelihood of black utilizing the top three spaces with yellow circles in the game is small, so the weakness compared to the first example is only perceived. 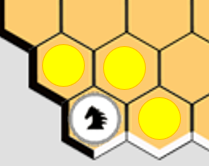 The bottom left/top right corner is also popular. Like the last example, it lacks both an offensive and defensive value. The real value lies if white can use it to make an indirect connection. They will have to control the game to get to that point, but I’ve seen this very placement equate into a win. 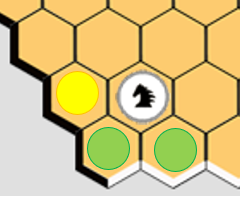 This is my preferred opening placement and the one I use the most. It creates an indirect connection with the white side and is still defensible on the black side by blocking the very corner hex. I have found that several high-level players on this site like to swap this opening if I play it (maybe 50% of the time). This tells me that it is a solid balance of strong, but also not too threatening. There are MANY other acceptable plays, so please don’t settle for one of these four. Experiment with your games to find one that shares the balance of strong and undesirable to your opponent! Remember how I said that there is no “best” opening? The opening is only as good as you make it. You must be able to steer the direction of the gameplay towards that opening piece if you are to gain any advantage from it. Know your own playstyle and you can turn that first move into an advantage. I will have a nugget or two eventually on Hex variants, but I did want to discuss the swap rule in relation to Small Hex and Large Hex. Respectively, Small Hex utilizes a smaller board, and Large Hex utilizes a larger board. When deciding on a first move, keep in mind that a move that does not touch an edge of the board (such as example 4 – my preferred move), can seem strong in Small Hex. Inversely, going out 3 or 4 spaces in Large Hex on the first move may not appear very strong. The larger the board, the more you might be able to get away with. The smaller the board, the closer to the edge you want that first piece to be placed. The last part of the Swap Rule that I want to discuss is the responses that black has to the move. In any example, black has three appropriate choices to react: - Accept the Swap Rule - Place a piece in the center of the board. - Place a piece in a way that can block the use of white’s first move. If white’s first move is not strong, my recommended response will always be to place a piece and claim the center of the board. The last option is viable but effectively allows white to have the first move and the center of the board. Only play this way if you know what you are doing. The next nugget, Connection Techniques, will provide a slightly advanced strategy for ensuring your pieces connect to your side. Nugget Votes This Nugget has received 2 upvotes and no downvotes. You need to log in first to vote on Nuggets. Nugget Comments Thanks! Posted on 15 May at 3:57PM by (steelbound) I've been wanting to get into this game, but, I feel lost when I try playing it. Looking forward to reading future installments.
Future Installments Posted on 2 Aug at 4:58AM by Point01IV I've really been slacking on this - work has gotten in the way. I will see what I can do to get another nugget or two out in the next few weeks! Thanks for reading!
|
©2000-2025 GoldToken.com LLC. All rights reserved. |